
I don't know how many patterns I went through, looking for one that would suit me. But all I ended up with was a pile of half-made booties that weren't quite right. Somehow, through the haze of frustration and hormones, I realized what was wrong. I don't like bulky seams if they aren't needed. Especially in baby wear, since they can be really sensitive to that sort of thing. So, I had been making all my booties seamlessly, using Judy's Magic Cast On. Which is a fantastic cast on. If you're making toe-up socks. If you're making booties, however, it's not so great. The resulting shape from this and other seamless cast on's makes a bootie that is shaped like a boat. And no one's foot is shaped like a boat. Once I realized this was the problem, I spent several days looking for solution, and finally came up with this method. And so, I present:

Once you get the hang of this method, it's really easy to use with any seamless bootie pattern out there. The idea is simple. To make the bottom of the bootie flat, we want a cast on that will "point" the stitches in all four directions, not just in two. I like to use dpn's for my booties, but if you want to use the magic loop on circulars it should work just the same.


P.S. Free pattern for these adorable baby ballet flats coming soon!
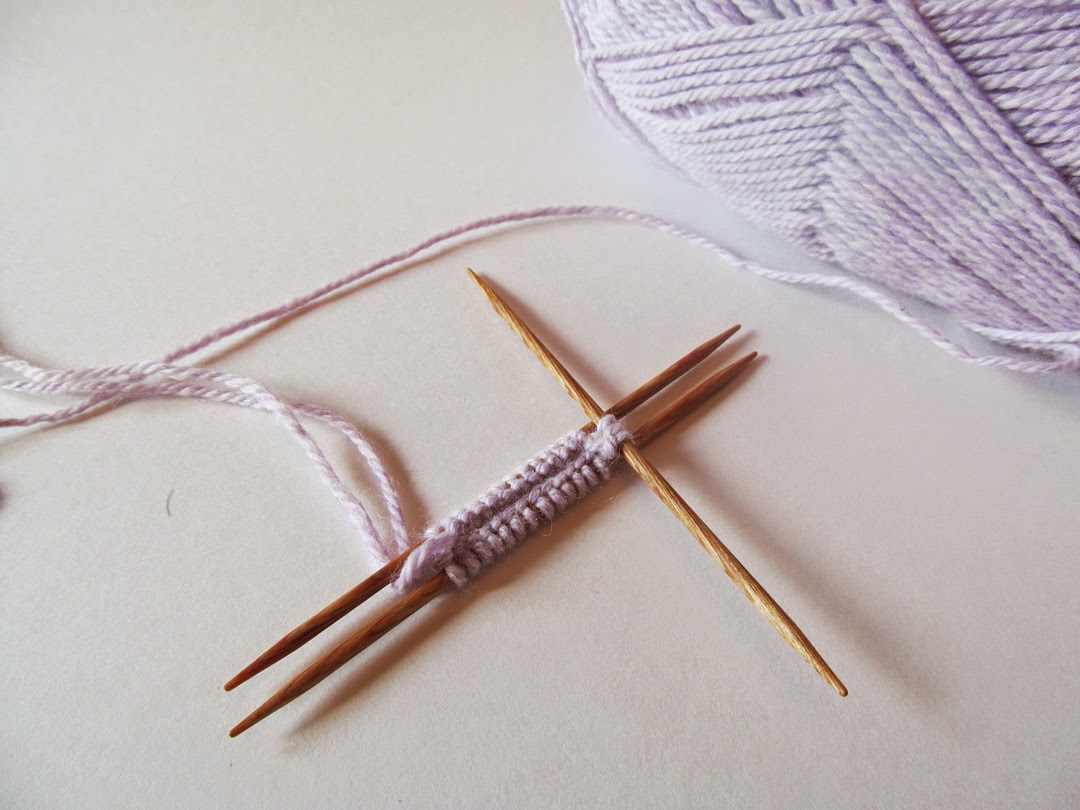
Before we start, we need to do some math. I know, I know; math is evil. But necessary. You'll need to take the number of cast on stitches, and divide it in half. If your cast on number is an odd number, subtract one first. If it's even, just divide by two. For this tutorial my cast on number is 29. So, (29-1) / 2 = 14. (You totally just had a flashback to algebra class, right?)
Now, cast on that many stitches, using a long-tail cast on.
Turn, and knit one row. Knit into the front, back, and front again of the last stitch. This will increase two stitches on the end. So now I have 16 stitches. (Note: If your pattern calls for an even number, only knit into the front and back once, increasing by one stitch.)
For this next part, I've done the long-tail cast on with waste yarn on the bottom, so it's easier to see. Here's what you should have so far, after you turn it over. You can see the little bumps on the bottom edge, in the green yarn.
Pick up and knit a stitch through each of these bumps. Be careful to go through each one; since they overlap a little bit it can be easy to miss one.
When you get about half way it can start to get a bit tight, so I like to use a third needle to pull the stitches through and place them on the second needle.
When you get done it should look like this. Your top needle should have your original cast on number plus two, and your bottom should have the original number minus one. So here I have 16 on the top, and 13 on the bottom. This should equal the number needed for your pattern cast on.
At this point you can arrange your stitches however you like to begin knitting. I like to arrange mine across three needles like this, so that I don't need stitch markers to mark the beginning of the round and toe stitches. The top side, as shown here, will be the inside of your bootie. Your next round should be a purl round, to work in garter stitch.
That's it! Quick and simple. And I think easier than most toe-up cast on's. And I did manage to get Bunny her booties made before she arrived. :) Leave me a comment and let me know what you think!
-Sparrow
P.S. Free pattern for these adorable baby ballet flats coming soon!
These are lovely! Great job and awesome cast on!
ReplyDeleteI love those ballet flats, but I'm new to knitting and I've been struggling with the cast on! I see the bumps and can pick them up... but do you knit each one as you pick it up? Or do you pick all 13 and then knit them all? I've tried both ways and cannot knit either way :( It feels so tight and weird. I'm sure I'm not doing it right! Could you make a video tutorial, do you think?? Thanks for the pattern!
ReplyDeleteHello Karen! When picking up the stitches along the cast on edge, do not knit them, just slide them on to your needle. It can get pretty tight, and might be difficult to manage at such a small gauge, especially for a new knitter. I would suggest maybe practicing it with larger needles until you're more comfortable with the technique. You can also try using circulars in the magic loop fashion, if you're more familiar with that. I know it's easier to see things like this in motion; a video might be possible. I'll have to do some planning and see if I can find someone to manage the camera for me. Thanks for reading!
DeleteThanks so much for the clarification! I'll give it a shot again :)
DeleteLet me know how it goes! If you still have trouble feel free to email me at pumpkinandbunny@gmail.com or contact me on Ravelry (SparrowGK). Happy knitting!
DeleteI have a question about your better bootie cast on also. The instructions say to pick up and knit a stitch, yet your answer above says: When picking up the stitches along the cast on edge, do not knit them, just slide them on to your needle. Which is it? And are you moving the increased stitches to the extra needle first? I've been knitting for 40 years, and I am having a hard time too! Thanks for the cute pattern! saradenbo on ravelry
ReplyDeleteHello Sara! When I refer to "picking up" a stitch I am referring to picking up the loop on the foundation cast on row and placing it on your needle; the "knit" comes when you pull a new stitch from the working yarn through this loop. I hope this clarifies it for you. I am working on putting together a video for this, since I know that using words alone can be confusing when certain things mean different things to different people. Please let me know if you are still having trouble. :)
DeleteHi again--I do understand the difference. What I was trying to say was your bootie pattern says pick up and knit, but your reply to the person above says do not knit them, slide them to your needle. I think the video will be most helpful. I will just keep checking and try again when I see it in video format. Thank you so much for your quick reply. Sara
DeleteI know that some people when picking up stitches refer to "pick up and knit" as picking up the loop, bringing a new loop through from the working yarn, and then knitting this loop again. I had assumed that the previous question was referring to the need to knit a new stitch into the stitch just picked up, although reading it again I could be wrong and I can see where the confusion is coming from. Hopefully getting a video up will help make this much clearer. Although honestly doing it either way would still work for the purposes of the cast on.
DeleteYou recommend a DK weight yarn. Do you have a brand recommendation?
ReplyDeleteMy personal favorite is the Perfection DK by Kraemer yarns.
Delete