Showing posts with label Sewing. Show all posts

Monday, November 10, 2014

Pattern Hacking Part One: Piece of Cake Pillowcase Dress

I've said before just how much I love a good basic pattern.  I like the challenge that comes with pattern hacking, and being able to put my own spin on these great designs, so I thought I'd do a little blog series and see just how many variations I can get out of one pattern.  One pattern I've found myself turning to frequently is the Piece of Cake peasant dress by Anna Maria Horner.  In fact, it's probably my most favorite thing I've sewn for Bunny, and it's no surprise I keep returning to make it again and again.  So for this series it seems only natural to use it.  Although I'll be focusing on altering this specific pattern, I hope to give you some tips and techniques for pattern hacking that can be applied to any pattern.  We're going to start with the most basic hack I've done from this pattern.  You can download the pattern for free from the link above if you'd like to follow along.  Lets get started!


This hack is probably the easiest kind of alteration to make.  In essence, all you have to do is leave off the sleeves! Simple, right?  But this wouldn't be much a tutorial if I didn't give you the details, so here we go.

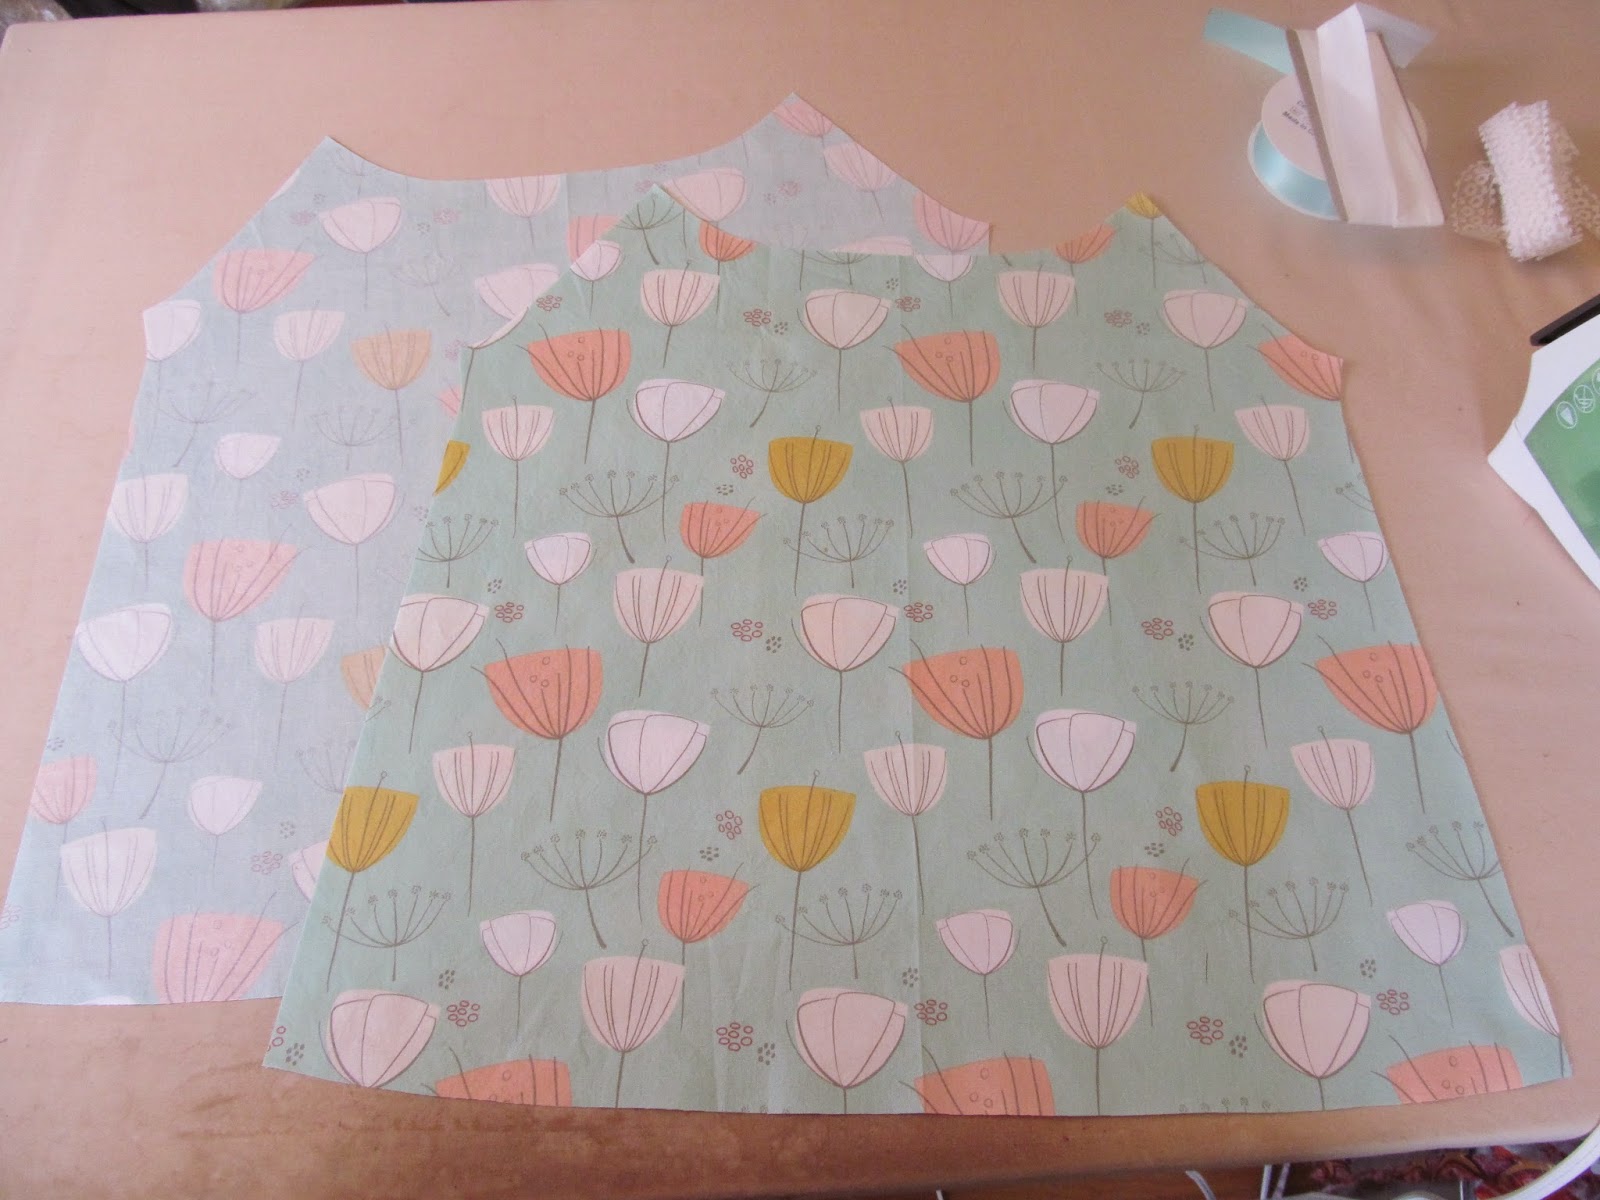
 For this tutorial I'm going to be using the 12 month size.  You will only need the front/back body piece, so don't worry about the sleeve options.  Whenever you're doing a pattern hack it's a good idea to trace off a new pattern piece.  I always trace my patterns onto freezer paper rather than cutting them out from the printer paper.  It saves ink and paper, and you can iron the freezer paper straight to your fabric for easy cutting.  I was able to squeak by with a half yard of fabric by cutting about an inch off the length of the dress.  This worked out okay because I did a smaller hem rather than the blind hem called for by the original pattern.  For anything larger you'll need at least 3/4 of a yard of fabric.  I'm also using 7/8 inch double face satin ribbon, 1 1/2 inch wide bias tape, and some pretty lace trim.  The color of your bias tape doesn't matter, since it won't show.

I really need to recover my ironing board.
 Cut out two body pieces.  To fit both body pieces onto a single half yard, I folded the fabric in half (selvedge to selvedge, the way it comes on the bolt) and then in half again.  If your fabric is a little slippery you can fold it in half, iron the centerline, unfold it and fold the selvedges in to the center.  (Think of it like folding a really big piece of bias tape.)


 Cut a piece of bias tape a little bit longer then your neckline and iron it open.
With right sides together, line up the top of the bias tape with the neckline and stitch along the top fold line.  You'll need to stretch the tape a bit around the curves.  Do this for both front and back pieces.


 Press the seam allowance up, and trim the end of the bias tape so it's flush with the arm seam.


 Press all four arm seams in by 1/4 inch, and over another 1/4 inch.  Include the edge of your bias tape in this seam.


If the edge of your bias tape sticks out a bit you can trim the corner off like this. 


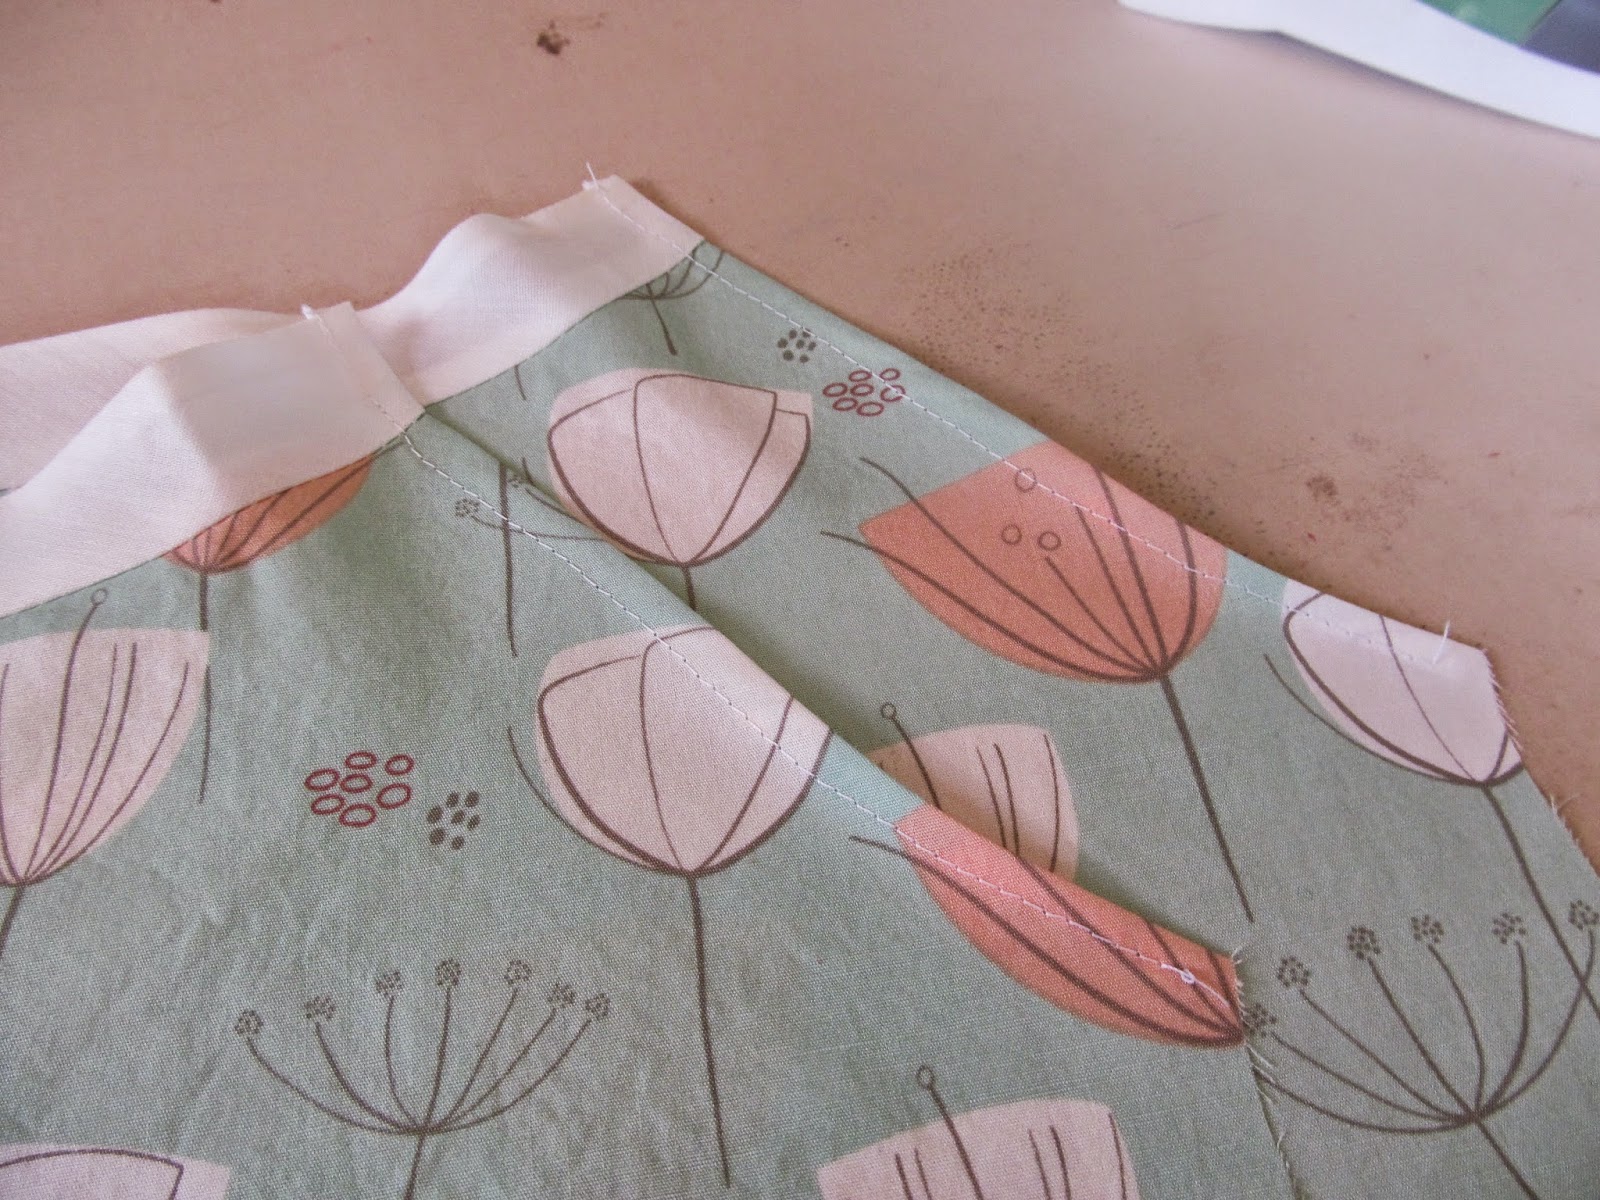
Stitch the arm seam. 
Seriously.  Ick.  Sorry!
Fold the bias tape over to the inside and pin in place.  You'll need to stretch it out as you sew a bit to get a smooth curve.


 Stitch the bias tape down to finish your neckline on both front and back pieces.


 Next we need to do the side seams.  Since this fabric is on the thin side I opted for french seams.  You can do yours however you like.


 Hem! I folded my hem up by 1/4 inch and another 1/2 inch.  (One of my bad sewing habits is that I generally just eyeball my hem.  Don't be like me.  Measure your hems; they'll be much nicer!)  I also topstitched lace over the hemline to add some interest.


If you did french seams, it's a good idea to trim a little bit out of the hemline where the seams are, so it'll lay nicely.  Otherwise you end up with those lumps and uneven stitches at the side seams.


 Now all that's left is to add the tie!  I'm using ribbon, but you could also make a fabric sash.  To measure my ribbon I looked up the elastic cutting guide for the original pattern, and then added 14 inches.  This makes my bow a little on the small side, but Bunny loves to chew on ribbon so I wanted it to be out of the way.  For a bigger bow I'd add at least another 10 inches.  Be sure to heat seal the ends of your ribbon with a lighter or candle, so they don't fray!


 Put a safety pin on the end of your ribbon or sash, and thread it through the casings made by the bias tape.  Since Bunny is so little and ribbons can be a choking hazard, I topstitched the ribbon into the casing at just one edge once I'd gotten it situated how I wanted.


 And that's it! Super cute and super fast!  I especially love the one I made here with some AMH voile I've been hoarding.  This is probably the fastest thing I've ever sewn, including playing around with new trims.  You could probably make one in under 30 minutes if you skip the fancy stuff. 


I love that I can throw one of these over a ready to wear outfit for an instant handmade upgrade.  So what do you think?  I'd love to see how creative you can get with this pattern hack!  Share your pictures with me on my FaceBook page or on Instagram (@thepumpkinandbunny), or just leave a comment!
-Sparrow

P.S. Here's a sneak peek at the fabrics I'll be using for the next hack!

Thursday, September 4, 2014

Back To School with Peekaboo Patterns!

Pumpkin actually started school two weeks ago, but with the wedding, holidays, and everything else he only went for two days before being off for a week.  Which also meant that I was a little late getting my back-to-school sewing done.  I try to at least get him a new shirt to wear on the first day of school every year, and this year he needed a new backpack, too.  I chose Peekaboo Patterns for both of these projects, and I couldn't be happier with the results!
First up, the classic oxford shirt.  I actually finished this one in time for the first day of school.  But then he wouldn't wear it.  Because the dandelion seed print was "too prickly!"  I'm thankful that my kid has such a good imagination, but sometimes it can make dealing with him difficult.  I tried explaining that it was just a picture of seeds, not real seeds.  I made sure that there wasn't anything actually poking or scratching him, and I even offered to let him wear a shirt under it.  No go.
Finally I realized that if I was going to get him to wear it, I'd have to do it in a way he understood.  So we mixed up a "softening potion" (vinegar and baking soda!) and washed the shirt with it.  Ta da!  Problem solved.  Plus vinegar is actually a fabric softener, so it really does feel softer!  Bonus!

As for the pattern, I really love how this turned out.  The instructions were great, and the fit is perfect.  This is Pumpkin's favorite style of shirt, so I'll definitely be making a few more.  The easing on the sleeves gave me a bit of trouble; with this pattern you ease the armscye into the sleeve, not the other way around like most patterns.  It seemed counter-intuitive at first, but it works.  I love that the pattern includes both short and long sleeve, and a wide range of sizes, so it'll be sure to get lots of use!
For the backpack, I really wanted to use the Lil' Adventurer's Backpack pattern, but I wasn't sure it would be big enough.  Pumpkin's school specifically requires a "regular sized" backpack large enough to fit a standard folder.  I always think it's a little silly, seeing these tiny preschooler's engulfed by their big kid sized backpacks.  After asking around in the Peekaboo Patterns FaceBook group, and a couple of measurements I decided to just add two inches to the height of the pattern.  And it worked out perfectly!
Pumpkin picked all the fabrics out.  He specifically wanted a "green and white zig zag stripe, and gold inside."  For the outside he instructed me to make it "green, green, green; ALL green!"  Fabric shopping with him is both hilarious and frustrating at times, because he always knows exactly what he wants and he doesn't compromise.  The ladies at the cutting counter thought he was a hoot.

He refused to pick a print for the front pocket, so I ended up doing a monster appliqué and some embroidery for his name.  I love the way it turned out.  And the pattern matching on the chevron was totally unintentional.  But it makes me happy.
It's hard to believe that my first baby is in his last year of preschool already!  He'll be starting kindergarten next year!  I'm trying to remember to get as much cuddle time in as I can, because I know he'll be hitting that "hugs are icky!" stage sooner than it seems.  But at least he loves his mama made's.  :)

-Sparrow

p.s. If you're waiting to hear the rest of the story on the wedding veil, I'm going to be posting it soon. I'm just waiting for some good pics, and permission to post them.  But I did get it done in time!  Here's a little peek...

Saturday, August 9, 2014

Sewing Buttonholes Without A Buttonhole Foot

Recently someone asked be to explain how I sew buttonholes, since I sew exclusively on my vintage Singer 401a, and it doesn't have an automatic button hole feature.  Now, I know there are buttonhole feet specially designed for these types of vintage machines, but for me it's just as easy to do it the old fashioned way.  And the fasted way to explain was to make a quick video.  I thought I'd go ahead and share it here, since I do mine a bit differently than most tutorials will tell you to do.

Some things to note before you watch the vid:

- I mark my lines the exact width of my button.  It makes for a pretty tight buttonhole, but I've found that they will stretch over time, so it's better to have them tighter to begin with.  Especially for clothing items.

- For my method I sew a "box", stopping and turning at the ends, as opposed to lengthening and shortening the zig zag width.  I do this mainly because I think it makes a stronger buttonhole that is less likely to unravel.

- When you stop and turn at the corners, you want your needle to be down in the outside position.  Additionally, you'll need to sew past your end mark a little bit before turning, so that the inside of your buttonhole is the correct length.  I usually just approximate, but if you need to measure it should be equal to the width of your zig zag stitch.

- I set my zig zag stitch to the widest setting, and my stitch length is just a bit less than a satin stitch.

- Normally I'd clean up all the inside bits after cutting open the buttonhole, so that there's no frayed bits poking out.


I hope you enjoyed my little impromptu video!  It was actually kind of fun to make.  Maybe I'll do more videos like this in the future, if there's any interest.  What sorts of things would you like to see? 

-Sparrow


Friday, July 4, 2014

Happy 4th of July!

Things are still going a mile-a-minute around here, but I managed to squeeze in some last minute patriotic sewing for Bunny!  I didn't have enough time to make Pumpkin anything, but he says he's okay with that.


This outfit is the perfect example of my "work with what you have" philosophy.  I rarely ever plan ahead for these kinds of projects, which means I'm always scrambling last minute for supplies.  Typically I pick my fabrics (or in this case, old linens!) first, and then pick a pattern that will work around what I have.  For this outfit I ended up choosing the Whimsy Couture Vintage Romper.  I love how it turned out!  And Whimsy Couture is having a patriotic contest, which I didn't know when I sewed this little beauty up!  So fingers crossed that I make it to the final round! <3

In other news, there may be a biiiig announcement coming soon.  Something exciting for anyone local to me!  Stay tuned!

And I hope everyone has a happy (and safe!) 4th of July!
-Sparrow

Tuesday, July 1, 2014

Quick Tip: FOE Drawstring

It's been crazy busy around here lately, and it's not looking like it's going to slow down anytime soon.  So I'm just popping by with this quick tip before I get back to working on all the new stuff.

Did you know that you can use FOE (fold over elastic) as a drawstring?!  It's my new favorite thing for baby pants.


The custom sizing of a drawstring with the ease of elastic!  And it's really easy to do.  Just cut a piece of FOE the same length you'd cut a drawstring and feed through as normal.  Tie the ends with an overhand knot or singe them with a lighter to keep them from fraying.

Now back to work!
-Sparrow

Friday, June 20, 2014

Guest Post at Oliver + S and the Honeycomb Shorts

Remember this?


My hexagon pocket version of the Oliver + S Sunny Day Shorts has been generating a lot of interest.  Mainly comments like "that's so cool!" and "how'd you do it?"  So when Rachel from Oliver + S asked me to do a tutorial for the hexagon pocket I was thrilled.  I'd already been planning on another pair of shorts with more hexagon's, because the first pair turned out so neat.  I wanted to switch it up a little bit and really play around with uniqueness of the pockets.  Are you ready for this awesomeness?


For the full tutorial, hop on over to the Oliver + S blog, where I'm sharing how to make these hexagon pockets.  They're really quite easy; once you see how they're made you might just be obsessed with shaped pockets.  The tutorial is for the hexagons, but you can use this technique to make any shape you want.

You can download the hexagon pocket template here.


Pumpkin seems to think they're the coolest thing ever, and I'm inclined to agree.  :)


He says this outfit give him super powers!  Big muscles!

-Sparrow

Wednesday, June 11, 2014

Knot Another Tote Tutorial

Who else finds themselves sewing gifts at the last minute?  Surely that's not just me.  It seems to happen every time.  My friend Kat recently graduated college (Yay!), and I found myself in the predicament of what to give her.  Since she knits, I knew a project bag would make a great gift.  So three days before her party, I decided to whip up something quick for her using some fabrics I had on hand.  This cute knotted tote was the result.  I love the little faux piping treatment on the handles.  It was so easy to do, and it adds a little bit of interest.  She says it's the perfect tote for everything.  She loved it so much she asked me to sew up a few more to put in her shop.  I thought someone out there internet-land might like to learn how to make one while I'm at it.  I know there are thousands of great tutorials for how to sew a basic tote out there.  But there's a few things I do a bit differently, so I'm making a tutorial anyways.  Click through to get the tutorial.  (There's a lot of pictures, so it may take a minute to load.)


How to make a fully lined tote with pocket, faux piped handles, and a knot accent.

Friday, May 30, 2014

Sunny Day Sewing

We've finally gotten summer here, with plenty of sunny days to go around.  One thing about living in Ohio I don't like; it goes from freezing cold to HOT almost overnight.  Forget spring, we go straight to summer.  So when I saw the new free pattern from Oliver + S, I knew it was the perfect thing to add to Pumpkin's summer wardrobe.


I made the Sunny Day Shorts in this lightweight denim, perfect for the heat.  I added inseam pockets and a hexagon pocket to the back, to coordinate with the shirt.  These shorts are a definite hit!  The fit is great, and they go together so quickly.  Even with the added details like the pockets and the extra topstitching.  I do so love my topstitching.  I'll definitely be making Pumpkin more of these.


This hexagon print, from Riley Blake, has been curing in my stash for awhile now.  I knew I wanted to make Pumpkin something with it, but I just wasn't sure what.  I ended up going with my favorite boys button down pattern, the Little Military shirt by Heidi & Finn.  I think these two patterns cooperate so well together!

Pumpkin insisted the pocket needed a zipper.  Who am I to deny the kid a zippered pocket?  He was also very insistent about the yellow buttons.  I was planning to go with blue or white buttons, but sometimes it's important to know when to pick your battles.


The tank underneath is from Fishsticks Designs.  It's the first time I've really tried to sew anything out of knit.  It didn't turn out too badly, but I did have some trouble with the hem.  You can see how it's still a little stretched out, and it's cut too short.  At least I have enough fabric to try again.  I do really like the pattern, the fit is great, and the instructions are simple and to the point.


I've been feeling a little guilty that I've been making so much stuff for his sister.  Fortunately he's not a jealous kid, and he loves his new outfit.  It's perfect for doing summer stuff, like climbing trees.


And rocks.


And seeing how quickly you can run to the end of the covered bridge and back.


Gosh, he's getting so big!  It's seems like the days are going by so fast now.  It's so easy to get caught up with the everyday rush; always planning the next thing on the list.  I have to remind myself to take a moment every day and just appreciate the here and now; to take life one stitch at a time.  :)

-Sparrow

P.S. I also managed to swatch for a new knit design this week!  I might even give you a peek at it soon… 

Saturday, May 24, 2014

I'll have a piece of that cake

      I will admit to actively stalking Anna Maria Horner's blog.  She always has such amazingly inspiring posts, and I adore her fabrics.  So when she posted the Piece of Cake dress pattern last week I knew that Bunny needed one.  Or five.  I just happened to have a small amount of Little Folks voile I've been hoarding.  It was just enough to make the dress and a pair of Knick Knack Knickers to go with it.  It was like destiny.

Ignore my dirty ironing board.
Of course, I just had to adjust the pattern a bit.  Because I can't follow a pattern as written to save my life.  But this dress was just begging for pockets.  Everything's better with pockets, right?

You almost can't even tell they're crooked!  Perfection is overrated anyways.
I also put a small piece of elastic in the top of the sleeves, and added a teeny little ruffle to the neckline. I added the same ruffle treatment to the bottom of the knickers, to tie it all together.


This was my first time sewing a blind hem.  Once I wrapped my brain around how to fold the fabric, it was pretty easy.  I think it turned out rather nicely, despite not having the special presser foot for it.  


I'm ridiculously happy with the results.  And did I mention how much I love this fabric?  It's so light and soft!  Perfect for summer!


Looks like Bunny approves of her new outfit. I had so much fun making it, and the possibilities are endless with this pattern.  That's why I love great basic patterns like this one, because you can dress them up and make them your own.  I think the next one needs a ruffle down the front, and possibly buttons.  What do you think?

-Sparrow